



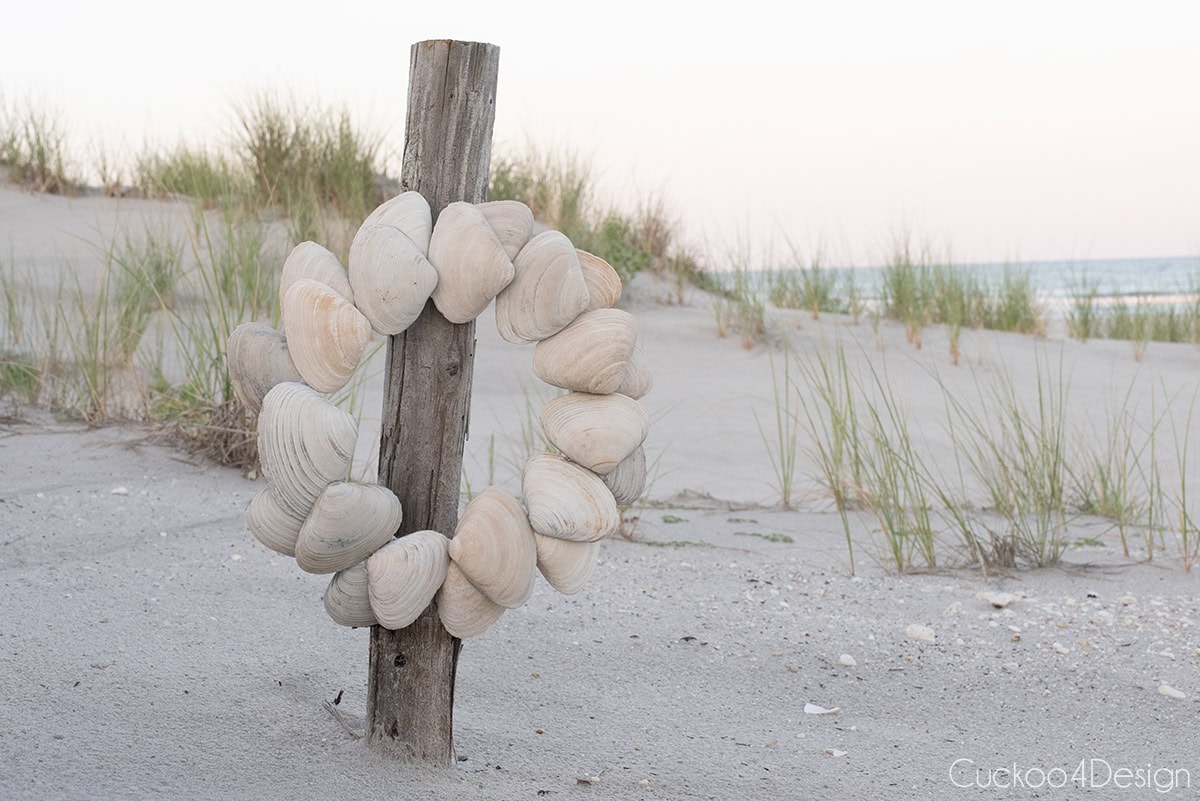
We just returned from our annual summer beach trip. This year, I collected a lot of large clamshells because they were the only ones I could find in abundance. It’s weird how every year is different regarding what I can find or not. These large clamshells can be used for creating my seashell candles too, but I wanted to make something different, which is why I came up with my DIY seashell wreath using large clamshells.
Supplies needed
Why an embroidery hoop works better than a regular wreath form
I purchased a metal wreath form but quickly noticed that it didn’t work well at all for this type of wreath. Thankfully, I also brought some old embroidery hoops that I still had from some of my macrame projects.
Let me explain this a bit better. The reason that the metal wreath form or any other wreath form didn’t work for this seashell wreath is that the wreath surface isn’t flat and is too broad. The clamshells are large, and the bottom part that you use to glue down is flat. This makes it very difficult to glue the shells down while also hiding the wreath form and keeping everything stable.
They also make broader wooden wreath forms, but those have a larger surface area, which is almost impossible to hide with these large shells and still be visually pleasing.
The embroidery hoop had the perfect small flat surface for the seashells while still keeping everything secure.
Step-by-step seashell wreath using an embroidery hoop
This year, I walked 5 miles every morning on the beach, like I always do. However, some of those mornings I barely found anything, and then other mornings I found a ton of large clamshells. The one morning my bucket was so heavy that the plastic strap broke. It was a good workout to carry the bucket too
I also collected a bunch of razor clamshells this year that I brought home with me and might still use for another beachy home decor craft. But let’s continue with my seashell wreath tutorial first.
Video tutorial
I made a short video to show you what I did. If it doesn’t load for you here on my blog, then you can also head on over to my YouTube Channel to watch instead.
Step 1: Clean the clamshells
I washed all the clamshells in the kitchen sink with soap and water. Usually, I also use a bit of bleach to clean seashells, but I skipped this step for this tutorial because I didn’t feel the need for it.
Let the clamshells dry completely.
Step 2: Prep your work surface
I placed a trash bag on a flat surface under the embroidery hoop to protect the surface underneath from the hot glue. The trash bag is thin enough to just be torn off the back of the wreath at the end. It worked really well.
You could possibly also use Saran Wrap or aluminum foil as well.
Step 3: Lay the first outer layer of clamshells around the embroidery hoop
These types of clamshells have one longer and one shorter side at the top. Place the longer side of the shell against the embroidery hoop to form the first outer row of clamshells of the wreath.
The longer side is better because it gives a larger surface to glue to the wood, as well as being more visually pleasing.
Don’t worry if there is a gap as I had pictured above. As you can see, the gap can be covered!
Step 4: Hot glue the clamshells to the embroidery hoop
Take each clamshell and add a layer of hot glue to the long side, and then press it against the embroidery hoop. After that, add some more hot glue to the top between the clamshell and the embroidery hoop. Repeat this with all the clamshells.
Let that hot glue cool off and dry.
Step 5: Lay the second layer of large clamshells on top of the first layer
For the second layer of seashells, you want to make sure that you overlap the gaps and that the shells lie stably on top of the first layer of shells.
I took my time playing around with the best seashell layout for the top. I had so many clamshells to choose from, which made it easier.
Step 6: Hot glue the second layer of clamshells to the wreath
When you glue down the second top layer of clamshells, make sure you don’t add too much hot glue, as it can easily create a hot-glue mess. I was able to scrape off some extra hot glue with a knife and scissors after it cooled.
Let the hot glue cool again before moving on.
Step 7: Tear the trash bag off the back of the wreath
When the hot glue has cooled off, slowly lift the wreath and trash bag off the work surface to ensure that everything is glued down securely. If not, you can add some more hot glue where needed.
After that, carefully tear off the trash bag from the back of the wreath with your hands. If you are having difficulty with this step, you can also use some scissors to cut the trash bag where needed.
Step 8: Add cord or ribbon to the wreath for hanging
Cut your ribbon or cord and knot it to the embroidery hoop on the back of the wreath. There are gaps between the seashells and the embroidery hoop where you can easily knot the hanging cord to the embroidery hoop.
Step 9: Add more seashell details (optional)
You can hang the seashell wreath, then step back and see if you want to add more seashell detail to it. Stepping back helps you see visually if you think it would add more interest or if there are any gaps that need to be filled. You can use smaller clamshells to glue over gaps where you can still see the embroidery hoop or where there are hot glue accidents, which can happen!
I’ve always wanted to use Crepidula fornicata, or slipper shells, which are the ones sticking to other seashells in the ocean. They have such a unique shape and kind of represent the shape of small leaves. This project was perfect for them.
I also noticed that the broken snail shells you can find in abundance on the beach are the perfect shape to use for gluing to a more flat surface. In the photos, you can’t even tell that they aren’t full snail shells.
Simply use your hot glue and glue gun to attach the smaller seashell details to the wreath.
The finished seashell wreath in two different versions
This post may contain affiliate links from which I will earn a commission at no extra cost to you. View my full disclosure policy.
I honestly love both versions of this seashell wreath so much. I made one for our friend’s beach house and one to take home; both have the added seashell detail just because I had so many extra seashells on hand.
The simple all-clam-shell version
I think the simple clam shell wreath would look so pretty hanging from a beautiful ribbon, but as I mentioned already, I only had macrame yarn on hand at the beach, and that worked perfectly well.
The simplicity of the clamshells is beautiful!
The smaller shells and a snail shell cluster version
I just love all the muted color variations of all these different types of seashells. These colors just make me happy!
Have you ever seen a wet seashell on the beach? The colors are so amazing when wet, but then you take it with you, and when it dries, you don’t even recognize the colors anymore?
You can also spray the seashell wreath with a varnish to create that wet look permanently. The varnish brings out the colors of the seashells more. I like the seashells both ways.
And in case you are wondering where the other one is hanging at home now. It is hanging on the fence by our DIY stock tank pool for now.
More of my seashell craft ideas
Tschüß,
Materials
- wooden embroidery hoop
- hot glue
- string/cord or ribbon for hanging
- large clamshells
- additional smaller seashells (optional)
Instructions
- Clean the clamshells
I washed all the clamshells in the kitchen sink with soap and water. Usually, I also use a bit of bleach to clean seashells, but I skipped this step for this tutorial because I didn’t feel the need for it.
Let the clamshells dry completely. - Prep your work surface
I placed a trash bag on a flat surface under the embroidery hoop to protect the surface underneath from the hot glue. The trash bag is thin enough to just be torn off the back of the wreath at the end. It worked really well.
You could possibly also use Saran Wrap or aluminum foil as well. - Lay the first outer layer of clamshells around the embroidery hoop
These types of clamshells have one longer and one shorter side at the top. Place the longer side of the shell against the embroidery hoop to form the first outer row of clamshells of the wreath.
The longer side is better because it gives a larger surface to glue to the wood, as well as being more visually pleasing.
Don’t worry if there is a gap as I had pictured above. As you can see, the gap can be covered! - Hot glue the clamshells to the embroidery hoop
Take each clamshell and add a layer of hot glue to the long side, and then press it against the embroidery hoop. After that, add some more hot glue to the top between the clamshell and the embroidery hoop. Repeat this with all the clamshells.
Let that hot glue cool off and dry. - Lay the second layer of large clamshells on top of the first layer
For the second layer of seashells, you want to make sure that you overlap the gaps and that the shells lie stably on top of the first layer of shells.
I took my time playing around with the best seashell layout for the top. I had so many clamshells to choose from, which made it easier. - Hot glue the second layer of clamshells to the wreath
When you glue down the second top layer of clamshells, make sure you don’t add too much hot glue, as it can easily create a hot-glue mess. I was able to scrape off some extra hot glue with a knife and scissors after it cooled.
Let the hot glue cool again before moving on. - Tear the trash bag off the back of the wreath
When the hot glue has cooled off, slowly lift the wreath and trash bag off the work surface to ensure that everything is glued down securely. If not, you can add some more hot glue where needed.
After that, carefully tear off the trash bag from the back of the wreath with your hands. If you are having difficulty with this step, you can also use some scissors to cut the trash bag where needed. - Add cord or ribbon to the wreath for hanging
Cut your ribbon or cord and knot it to the embroidery hoop on the back of the wreath. There are gaps between the seashells and the embroidery hoop where you can easily knot the hanging cord to the embroidery hoop.